Saturday, 31 August 2013
Shabby Chic Gilding
Gilding or applying gold leaf to furniture or other objects can be a bit daunting in the beginning, but it is worth a try, especially if you like a bit of lustre and richness to your work.
Gold leaf is very thin and the 24 karat gold leaf is expensive, so in the course I used the imitation gold leaf or "Dutch sheet" as it is sometimes called.
The gold leaf is applied with gold size, a thin glue that stays tacky for up to 20 hours.
On Wednesday night the ladies didn't use a gilders pad or gilders knife, they are traditionally used for gilding.
We used scissors to cut the gold leaf and a little Vaseline on a soft brush to pick up the gold leaf before applying it to the item.
Gold leaf needs to dry well and is a bit fragile till varnished.
The imitation leaf can tarnish and needs to be varnished.
The gold leaf can be gentle rub down with fine steel wool and methylated spirits and antiqued with burnt umber oil paint.
The little angel icon is antiqued, the colours are toned down.
I love the look of gilding on furniture and paintings. In Italy I was so inspired by the most beautiful art works in churches, often gilded and they still had the most amazing glow even after centuries.
Tuesday, 27 August 2013
Shabby chic Crackle
The shabby chic course is well on its way. Tomorrow night I will teach how to apply gold leaf on smaller items or furniture pieces.
Last week the ladies tried to crackle frames and furniture. There are many products on the market, but we used PVA glue to achieve bigger cracks. The secret is not to let the glue dry and apply the second coat of paint when the glue is tacky. Also a contrasting colour works better.
Experimenting is the key. The ladies found the process a bit scary, because you don't really know the results, but thats the exciting part.
To achieve a very fine crackling effect I like to use the Jo Sonja crackle medium brand.
You have to apply a few coats of paint and than apply the crackle medium while the paint is not cured.
Very fine cracks appear and will show up more by rubbing a darker glaze into the cracks.
The Jo Sonja product is waterbase, so no yukky fumes to inhale.
The crackled pieces can be waxed or varnished to protect.
The chair has a "shabby chic" finish and will be protected with a matt varnish.
Again I use a waterbase varnish and let it cure well.
Tomorrow I will photograph results of the gilded items done in the course.
Friday, 23 August 2013
Sunday, 18 August 2013
A lovely sunday
Tomorrow I will buy some more tiles for the next project; a gecko on a riverbed stone.
Karin and I enjoyed a lovely lemon cake for afternoon tea from the lemons of my lemon tree.
The cake is easy to make:
- 2 cups of self raising flour
- 1 cup of yoghurt
- 100 grams of butter or 4 table spoons of vegetable oil
- half a cup of sugar
- 2 eggs
- the zest of two lemons finely grated
- half a cup of milk if needed.
Cream the butter and sugar or if using oil instead of butter, stir the oil and sugar.
Add the eggs and lemon zest and stir well.
I like to use my hand mixer.
Add the flour/ yoghurt and mix again.
Add milk if the mix is to thick.
Pour the mixture into a greased tin and bake for about 40 minutes on 180 Celsius.
Topping:
- juice of one lemon
- half a cup of sugar
When taking cake out of the oven, prick holes in the top and pour the lemon/sugar mixture over the warm cake.
The lemon juice will soak into the cake and gives the cake a great flavour.
Cool completely and turn out carefully.
This cake can also made with gluten free flour and 2 teaspoons of gluten free baking powder, the yoghurt and lemon juice makes the cake moist.
Friday, 16 August 2013
mixed medium paintings
Wednesday, 14 August 2013
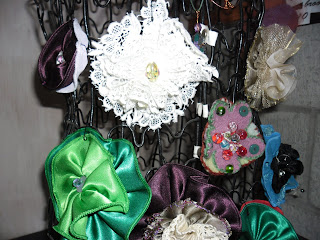
Brooches for charity
Each brooch is a gift for anyone donating money to my friend Heleen Boonstoppel working as a nurse in Bangladesh in a hospital for the poorest of the poor.
Heleen has to support her work and doesn't receive income from the hospital.
Her blog is:http://heleeninbangladesh.blogspot.nl/
Look it up and follow her journey.
Monday, 12 August 2013
Theorem painting
This painting is done with oils on velvet and called "theorem" painting.
I had to cut different stencils and placed each stencil on the velvet and used my finger to rub a little oil paint onto the fabric. Slowly the image is build up in layers.
This kind of painting was very popular in Victorian times.
Subscribe to:
Comments (Atom)


