Showing posts with label recipes. Show all posts

Saturday, 24 December 2016

Dutch speculaas biscuits recipe

Christmas biscuits
Every Christmas I do baking and some of the recipes are becoming traditions in our family, like the Christmas bread filled with almond paste, the Dutch pastry wreath filled with almond paste and the speculaas biscuits.
Yesterday we had suddenly a big hailstorm while I was baking and it was not forecast,this is a setback for the local fruit growers, especially the berry growers in the area.
It felt a bit like winter, but today the summer sun is out again.


Some of my handpainted Christmas decorations

The sudden hail storm
The recipe for the speculaas biscuits:

250 gram flour
175 gram butter
200 gram brown sugar
1/2 teaspoon of baking powder
3 table spoons of milk
1 tablespoon of speculaas spices
or 1/2 tsp mace, 1/2 tsp aniseed, 1/4 tsp ground cloves, 1/4 tsp ground ginger, 1/4 tsp ground nutmeg, 21/2 tsp of cinnamon.

In a bowl add the flour, spices, sugar, baking powder and stir together.
Add the butter and the milk and knead the mixture with your hands into a soft ball and leave in the fridge for an hour or longer.
Roll the dough between two sheets of grease proof paper till 2 cm thick and use different biscuit cutters to cut out shapes.
Bake at 160 celsius oven for 10 minutes or till biscuits are brown.
Cool biscuits on tray and store in containers.

Have a blessed Christmas.

This week I am part of Paint Party Friday


Tuesday, 15 March 2016

Autumn at our cottage

Summer is gone and Autumn has arrived for already fourteen days when I believe the calendar on the wall.
Autumn in New Zealand  officially starts on the first of March.
While half of the world goes into the beginning of Spring and warmer weather, we are heading towards the colder mornings and nights.
I must say, we had only a few of those colder days, for the rest of the time it is still hot and the outside temperature today reached 28 degrees again and I am sweating in the kitchen making crab apple jellies and rhubarb ginger jam.
Last week my friend Elizabeth gave me a box of the sweetest Italian tomatoes "Roma"  from her garden and I bottled them whole  in jars and also made tomato sauce and I will write the recipe in the blog post. So keep on reading.

Shabby Chic Beach cabinet
Now the weather is getting slightly cooler I have finished the cupboard in my "garage studio", it was just to hot to work in there during February. I painted the cupboard with chalk paint blue first and then used a thinner coat of chalk paint green on top and sanded this layer of paint back to show the green colour underneath.
Then I decorated the cupboard door with a fish image from "The Graphics Fairy" website and painted the shells and seahorses with acrylic paint.
The cupboard is finished with wax to protect the surface.
So voila an old brown cupboard has now a new life in beach style.
The shells are painted in acrylics

Tomato sauce from my homegrown tomatoes.
This week I have been busy bottling and preserving; jams and jellies for my road stall and also for ourselves the tomatoes and plums in sauces and whole in the freezer for winter soups and pasta.
Next the pears are getting ripe,so bottling and freezing again.
My plant and preserve stall at the gate

The last of the summer sunflowers.
The recipe for the tomato sauce:

  • Fill a big pot with tomatoes and cook until soft.
  • Tip the whole lot into a colander on top of the big pot again and use a wooden spoon to push the pulp through the colander so you are only left with the tomato skins.
  • Add half a cup of cider vinegar, half a cup of sugar,4 or 5 crushed garlic cloves, pepper and salt  to the sauce in the pot and if you want a bite to the sauce some chili flakes and cook slowly for a hour or so till the sauce thickens.
  • You can thicken the sauce more with cornflour if needed.
  • Pour hot into sterilized bottles and seal for the best, full of antioxidants tomato sauce ever.


Monday, 29 December 2014

Cottage in the country; summer cherries

 For the Northern Hemisphere it is winter, snow and freezing temperatures and for many it was a  white Christmas.
 For the Southern Hemisphere it is summer, mid summer and we just had our longest day.
 Today the temperature reached 30 degrees and it was really hot.
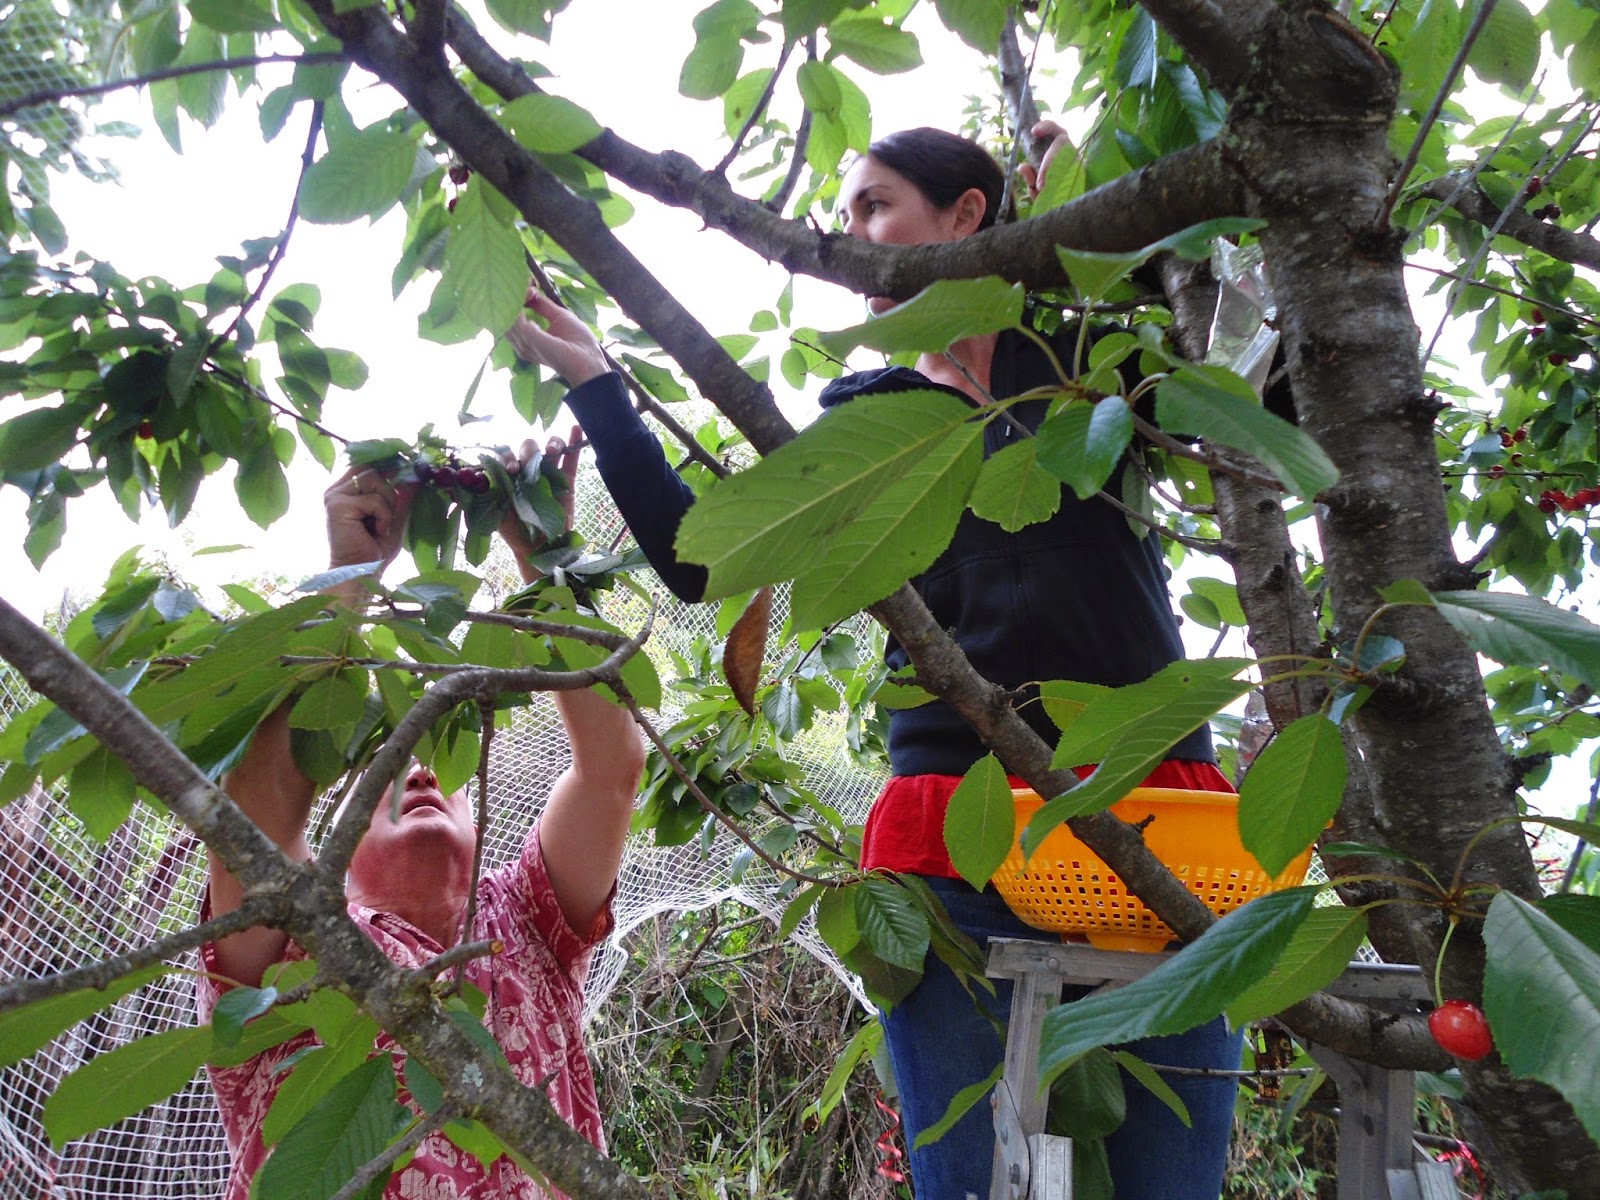
 In our small orchard Henk and I found a big cherry tree, because we moved into our cottage in  October, we  don't know what kind of cherries,but the tree had a good crop.
 In the beginning of December Henk and Paul put a bird net over the tree with great difficulty, but it  helped a lot to protect the cherries and not feed our feathery friends.
Bottled cherries with vodka
Of course I had to do something with our cherries and after sharing with my friends and neighbours I still had plenty left over. Bottling was next and I bottled cherries with sugar water and vodka, so for winter Henk and I can enjoy some nice infused cherries over ice cream!
Rachel and Henk picking the cherries

Lots of cherries
But after bottling I still had cherries left over and in the Netherlands, in our province Limburg fruit flans or "vlaaien" as they are called in the local dialect are very popular.
Cherry flan
I decided to bake cherry flans for our dessert, very nice with cream or ice cream.
The recipe is from a old recipe book my mother gave me years ago and it is a recipe for a "kersen vla" but not with the traditional yeast dough.
I share this recipe with you and the dough can be used for different fruit flans as well.

Cherry flan recipe:

250 gram flour
1 1/2 teaspoon baking powder
half cup of milk
30 grams sugar
50 grams butter
1 egg

Mix all the ingredients together and knead into a firm dough.
Roll out with rolling pin, I put some extra flour on the bench to make the dough less sticky.
Place the dough in the flan pan or form, this recipe is enough dough for two flans.
Then I add the cherries on top of the dough and use any jam I have and warm about 4 table spoons of the jam in the microwave and spread the jam over the cherries with the back of a spoon.
I have used plum jam or black currant jam, very nice.
Bake the cherry flan for 20 to 30 minutes in the oven on 180 degrees Celsius.

Enjoy with cream or ice cream! Also these fruit flans freeze well.


Friday, 21 November 2014

Recipe for Elder flower Cordial

To my wonderful surprise I found a big Elderberry tree in the paddock and we moved into our cottage just in time to see the tree coming into flower. I have made elder flower cordial in the past and followed a recipe given to me by a friend.
The recipe is very common; the elder flowers are steeped in sugar water with lemon and citric acid for 24 hours.
This recipe works well, but I find the sugar water with the elder flowers a bit sticky to pour through the muslin cloth, so I have changed the recipe to make the process less 'sticky', but with the same result.
Two big bottles of elder flower cordial
The recipe is as follow:
After picking about 10 to 15 elder flower heads I soak the flowers in water and rinse well to get rid of little insects.
Next I leave the elder flowers to steepe in a bowl with 1 liter of water, one sliced lemon and 25 grams of citric acid for 24 hours.
I buy the citric acid in the supermarket and this is to preserve the cordial.
Elder flowers on the tree
After 24 hours I pour  the water with the elder flowers and lemon through a muslin cloth into a cooking pot and squeeze the flowers to get all the liquid into the pot.
Basket full of elder flowers

washing the flowers

The elder flowers steeping with lemon

Adding sugar
I heat the elder flower liquid on the stove and when boiling add 500 grams of castor sugar and stir till dissolved. I like to sterilize my bottles by pouring boiling water into the bottles and rinsing, then I leave the bottles and lids in the oven heated to 50 degrees Celsius for half hour.
I pour the hot elder flower cordial into the sterilized bottles and screw the lids on tight.
This cordial is not over sweet, but very refreshing with soda water or can be used in baking.
My elder flower tree in the paddock

Wednesday, 8 October 2014

'Super food' Dutch curly kale recipe

Its a funny idea that suddenly Curly Kale becomes a "super food" while growing up I have consumed Curly Kale since  I was a toddler and I am now 58 years old.
Curly Kale or called "boeren kool" translated "farmers cabbage", don't know why, is a staple food during winter time in the Netherlands.
The winters can be long and cold and not much grows in the bare soil over winter except curly kale and endive, also one of the healthy foods.
Curly Kale is packed with vitamin C and other goodies, so we eat this vegetable a lot during winter mashed raw with potatoes and bacon.
Isn't it great that my parents not only grew their own vegetables but also fed me this "super food" and they didn't knew then how much we now crave for all this amazing food been around for years.

Curly Kale growing in my garden bed
After picking the curly kale from the garden I mostly soak the leaves in cold salty water for a while, most bugs,like little snails, hate salty water so they pop up to the surface and I can get rid of unwanted extras. I don't spray, I rather put up with little bugs then chemicals on my vegetables.

Soaking in salty water to get the bugs out.
The winter in the Netherlands is cold and mostly this dish is served with extra protein, like sausages and bacon.
Frying the sausages and bacon.
 The bacon and the very fine cut raw Curly Kale are mashed through the cooked potatoes.

Steamed Curly Kale.
 My Curly Kale has been in the garden since autumn, because the flavour really intensifies and the leaves can get a bit tough, I steam the leaves for 3 min to soften. Also I remove the stalks.
Then I  mash the Curly Kale and bacon through potatoes and serve with sausages and applesauce. Yummy!
A plate with yummy food.

Friday, 18 April 2014

Recipe for home baked Easter bread.

 My mother made Easter Bread every Easter and it became a tradition in my family.
 In Dutch we call this bread "Krentewegge", like bread filled with raisins.
 I kept this tradition and make this bread for Christmas and Easter and my children,now adults grew up with  this tradition in New Zealand.
 I am maybe not using entirely my mothers recipe, but I made it my own and I love to share this recipe with you, let me  know what you think!

A week before Easter I make the almond paste and leave this paste in aluminium foil to mature in the fridge.
This makes the almond paste yummy!

Almond paste:
250 grams of ground almond
200 grams of sugar
1 egg
A little vanilla essence
Grated rind of one lemon.
Mix all the ingredients together with a wooden spoon, wrap in aluminium foil and leave in the fridge.
The bread warm out of the oven.
The recipe for the bread:
1 1/2 cup warm water
2 Tbsp sugar
1 Tbsp dried yeast
1 Tbsp vegetable oil
1 Tsp of salt
4 cups of flour
1/2 packet of raisins.

Dissolve the sugar in the warm water, then sprinkle the yeast into the water. Add the oil and stir.
Leave to sit for 10 minutes till the yeast mixture starts to bubble.

Mixing the ingredients
Add the remaining ingredients except the raisins.
I leave the raisins to soak in a bit of fruit juice to make them softer, the raisins are added after the first rise of the bread.
Mix the ingredients with a wooden spoon till the dough becomes away from the side of the bowl. 
Sometimes when the mixture is to dry I add a little extra water.


I take the dough out of the bowl and sprinkle just enough flour on the bench to stop the dough sticking. I knead the dough till smooth and satiny and not sticking to my hands anymore.                                                
The kneaded dough
When I was making the bread it was a cold and rainy day, so I placed a hot water bottle under the bowl to let the dough rise till twice the size.
The dough rising with help of a hot water bottle
After 2 hours take the dough out of the bowl and when it is sticky place a bit of flour on the bench before kneading.
Drain the raisins and dry in a clean tea towel before kneading through the dough, I add the raisins in small amounts.
The almond paste is rolled into a long piece and placed into the open folded bread.
I close the bread and push the sides together and leave the bread to rise again for 2 hours till double in size.

With fruit and almond paste
Risen dough ready to go into the oven
Bake the bread in a hot oven 180 degrees for 20 to 25 minutes till sounds hollow when tapped with a knife. The bread is nice with butter or a little icing sugar sprinkled on top.
Ready to eat.

Sunday, 18 August 2013

A lovely sunday


A lovely day of mosaicking with my friend Karin. I have finished the "lamp stand" vase and waiting for the adhesive to dry and then I will grout the vase.
Tomorrow I will buy some more tiles for the next project; a gecko on a riverbed stone.
Karin and I enjoyed a lovely lemon cake for afternoon tea from the lemons of my lemon tree.

The cake is easy to make:
  • 2 cups of self raising flour
  • 1 cup of yoghurt
  • 100 grams of butter or 4 table spoons of vegetable oil
  • half a cup of sugar
  • 2 eggs
  • the zest of two lemons finely grated
  • half a cup of milk if needed.
Preheat the oven to 180 Celsius.
Cream the butter and sugar or if using oil instead of butter, stir the oil and sugar.
Add the eggs and lemon zest and stir well.
I like to use my hand mixer.
Add the flour/ yoghurt and mix again.
Add milk if the mix is to thick.
Pour the mixture into a greased tin and bake for about 40 minutes on 180 Celsius.

Topping:
  • juice of one lemon
  • half a cup of sugar
Combine sugar and lemon juice in a cup.
When taking cake out of the oven, prick holes in the top and pour the lemon/sugar mixture over the warm cake.
The lemon juice will soak into the cake and gives the cake a great flavour.
Cool completely and turn out carefully.
This cake can also made with gluten free flour and  2 teaspoons of gluten free baking powder, the yoghurt and lemon juice makes the cake moist.